Summary: in this tutorial, you’ll learn how to use the JavaScript history pushState() method.
Introduction to the JavaScript history pushState() method
The history.pushState() method allows you to add an entry to the web browser’s session history stack.
Here’s the syntax of the pushState() method:
history.pushState(state, title, [,url])Code language: CSS (css)The pushState() method accepts three parameters:
1) state
The state is a serializable object. When you navigate to a new state, a popstate event is fired. And the popstate event has a state property that references the history entry’s state object.
2) title
Most browser currently ingore this title property. If you want to change the title of the document, you can use the documen.title property instead.
In practice, you pass an empty string to the title parameter.
3) url
The optional url allows you to define the new history entry’s URL. The URL must be the same origin as the current URL or the method will throw an exception.
When you set the new url, the web browser won’t load the url. The url defaults to the current URL if you don’t specify it.
JavaScript history pushState() example
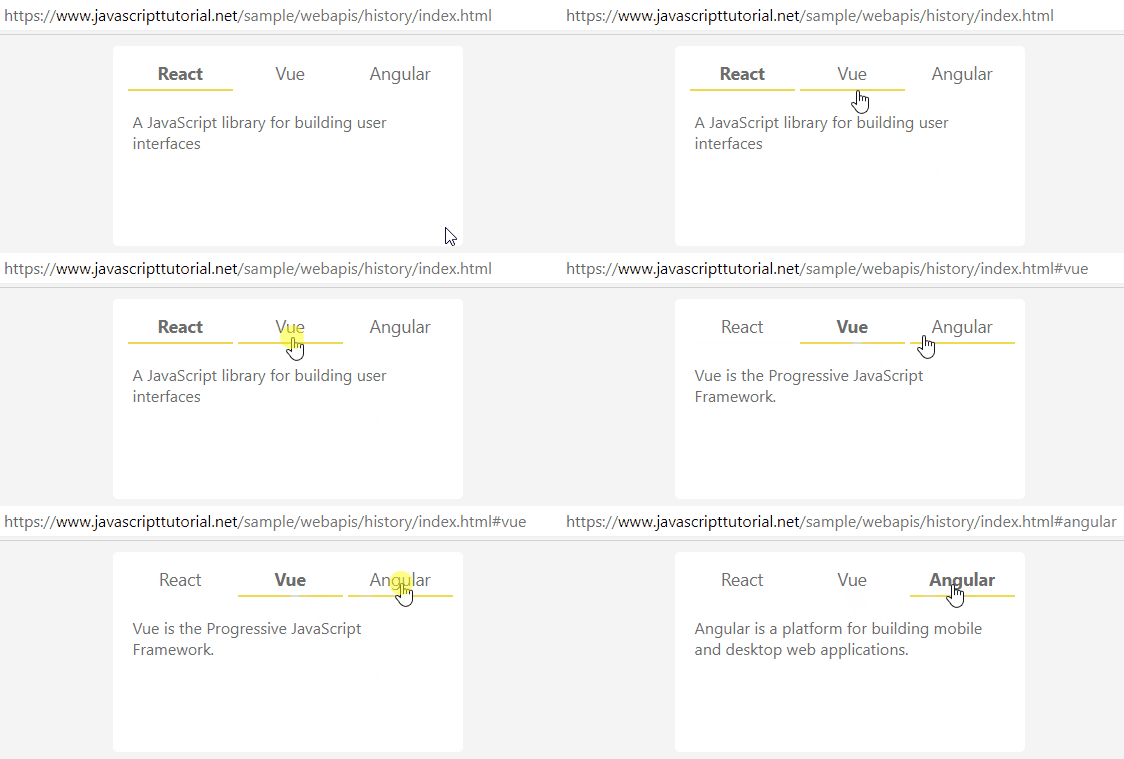
We’ll make a simple application that shows three tabs: React, Vue, and Angular.
When you click a tab, it’ll show the content of the selected tab. it’ll also update the URL using the history.pushState() method:
If you copy the URL with the hashtag and load it from the web browser, the app will load the corresponding content associated with that URL.
Click the following link to see the demo of the app.
Make the index.html page
The following defines the index.html page:
<!DOCTYPE html>
<html lang="en">
	<head>
		<meta charset="UTF-8" />
		<meta name="viewport" content="width=device-width, initial-scale=1.0" />
		<title>JavaScript History API: pushState Demo</title>
		<link rel="stylesheet" href="css/style.css" />
	</head>

	<body>
		<div class="container">
			<div class="tabs">
				<ul>
					<li class="active" id="tab1">React</li>
					<li id="tab2">Vue</li>
					<li id="tab3">Angular</li>
				</ul>
				<div class="content">
					A JavaScript library for building user interfaces
				</div>
			</div>
		</div>

		<script src="js/app.js"></script>
	</body>
</html>
Code language: HTML, XML (xml)
And you can find the style.css file here.
In the app.js file:
First, select the tabs and content elements using the querySelector() method:
const tabs = document.querySelector(".tabs");
const content = document.querySelector(".tabs > .content");Code language: JavaScript (javascript)
Second, define a map object that associates the URL hash with each tab id:
const hashes = new Map([
    ["#react", "tab1"],
    ["#vue", "tab2"],
    ["#angular", "tab3"],
]);Code language: JavaScript (javascript)
Third, define another map called data for mapping the tab id with an object. The object has two properties: url and content.
const data = new Map([
    [
        "tab1",
        {
            url: "index.html#react",
            content:
                "React is a JavaScript library for building user interfaces.",
        },
    ],
    [
        "tab2",
        {
            url: "index.html#vue",
            content: "Vue is the Progressive JavaScript Framework.",
        },
    ],
    [
        "tab3",
        {
            url: "index.html#angular",
            content:
                "Angular is a platform for building mobile and desktop web applications.",
        },
    ],
]);Code language: JavaScript (javascript)
Fourth, when each tab (or li element) is clicked, the click event occurs. To make it more efficient, we’ll use the event delegation.
So instead of handling the click event on each tab, we’ll handle the click event on the parent of each tab:
tabs.addEventListener("click", function (event) {
    if (!event.target.id) return;
    update(event.target.id);
});Code language: JavaScript (javascript)
The if statement ensures that the event handler only updates the content and url if the click event occurs on each individual tab. It’ll do nothing when you click the content area of the tab.
Inside the event handler, we call the update() function and pass the tab id into it.
Fifth, the following defines the update() function:
const update = (tabId) => {
    // remove the active class of the previously selected tab
    const currentTab = tabs.querySelector(".active");

    if (currentTab.id != tabId) {
        currentTab.classList.remove("active");
    }
    // add active class to the selected tab
    const selectedTab = document.getElementById(tabId);
    selectedTab.classList.add("active");

    const entry = data.get(tabId);

    if (entry) {
        // update the URL
        history.pushState(null, "", entry.url);
        // change the content
        content.innerHTML = entry.content;
    }
};Code language: JavaScript (javascript)
The update() function removes the .active class from the current tab and sets the same CSS class to the currently selected tab.
It also gets the url and content from the data based on the tab id. To update the URL, it uses the history.pushState() method.
The app should be working as expected with only one issue.
If you copy the URL:
https://www.javascripttutorial.net/sample/webapis/history/index.html#angularCode language: JavaScript (javascript)… and paste it into the new browser window, the app will show the React tab instead of Angular tab.
To fix this, we get the hash from the URL using the location object and call the update() function when the page is loaded.
(() => {
    // get tab id from the hash
    const tabId = hashes.get(window.location.hash);
    // update the tab
    if (tabId) update(tabId);
})();Code language: JavaScript (javascript)
The following shows the complete app.js file:
const tabs = document.querySelector(".tabs");
const content = document.querySelector(".tabs > .content");

// store the relationship between hash & tab id
const hashes = new Map([
    ["#react", "tab1"],
    ["#vue", "tab2"],
    ["#angular", "tab3"],
]);

// store the relationship between tab id and contents
const data = new Map([
    [
        "tab1",
        {
            url: "index.html#react",
            content:
                "React is a JavaScript library for building user interfaces.",
        },
    ],
    [
        "tab2",
        {
            url: "index.html#vue",
            content: "Vue is the Progressive JavaScript Framework.",
        },
    ],
    [
        "tab3",
        {
            url: "index.html#angular",
            content:
                "Angular is a platform for building mobile and desktop web applications.",
        },
    ],
]);

tabs.addEventListener("click", function (event) {
    if (!event.target.id) return;
    update(event.target.id);
});

const update = (tabId) => {
    // remove the active class of the previously selected tab
    const currentTab = tabs.querySelector(".active");

    if (currentTab.id != tabId) {
        currentTab.classList.remove("active");
    }
    // add active class to the selected tab
    const selectedTab = document.getElementById(tabId);
    selectedTab.classList.add("active");

    const entry = data.get(tabId);

    if (entry) {
        // update the URL
        history.pushState(null, "", entry.url);
        // change the content
        content.innerHTML = entry.content;
    }
};

(() => {
    // get tab id from the hash
    const tabId = hashes.get(window.location.hash);
    // update the tab
    if (tabId) update(tabId);
})();Code language: JavaScript (javascript)
Summary
- Use the
history.pushState()method to add an entry to the web browser’s session history stack.
