Summary: in this tutorial, you will learn how to build a React Todo App step by step.
React Todo App overview
The React Todo App allows you to add a new todo item, edit an existing todo item, delete a todo item, and set a todo item as completed.
The following picture shows the app that we’re going to build:
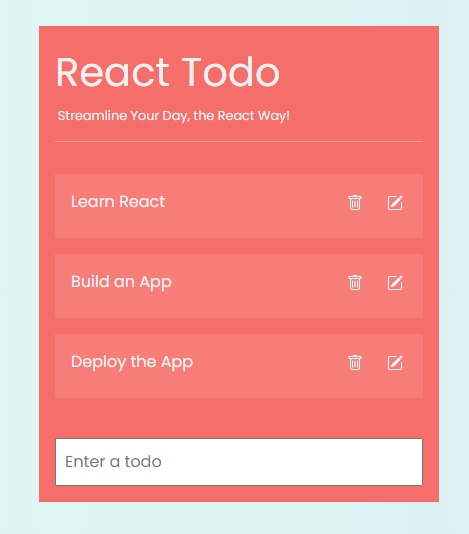
When you input a title and press the Enter (or Return) key, it will create and add the new todo item to the list.
Clicking the Edit button will display a form that allows you to modify the todo item. Also, clicking the Delete button will remove the todo item from the list.
When you double-click a todo, the app will mark it as completed and apply the strikethrough to the todo title.
Component hierarchy
The following shows the component hierarchy of the Todo app:

TodoCreate– Add a new todo item to the list.TodoList– Display the todo list.TodoShow– Display individual todo item.TodoEdit– Edit a todo item.
The App holds the state of the application which is the todo list.
TodoCreate component
The TodoCreate component to add a new todo item to the list. It does so by executing a createTodo function passed down from the App component.
The createTodo function adds a new todo item to the todo list in the App component.
TodoList component
The TodoList component displays the todo list. It uses the todo list passed down from the App component to render a list of TodoShow components.
TodoShow component
The TodoShow component renders each todo item.
Double-clicking the the title of a todo item toggles its status between completed and incomplete. The TodoShow changes the status of a todo item by executing the changeTodo function passed down from the App component through the TodoList component.
Clicking the Delete button in the TodoShow component removes the todo item from the list. This is done by executing the removeTodo callback passed from the App component through the TodoList component.
Clicking the Edit button will show the TodoEdit component.
TodoEdit component
The TodoEdit component updates the title of a todo by executing the changeTodo function passed down from the App component through the TodoList and TodoShow components.
After completing the change, the TodoEdit should display the TodoShow component.
Creating a new React Todo app
Step 1. Open the terminal and run the following command to create a new React app:
npx create-react-app todoCode language: JavaScript (javascript)Step 2. Delete all files in the src directory.
Step 3. Create the following components directory under the project directory. We’ll store all the React components in the components directory.
Step 4. Create the following new files:
| File | Directory | Description |
|---|---|---|
index.js | src | The entry file for the React app |
App.js | src | The App component |
App.css | src | The CSS file |
TodoCreate.js | src/components | The TodoCreate component |
TodoList.js | src/components | The TodoList component |
TodoShow.js | src/components | The TodoShow component |
TodoEdit.js | src/components | The TodoEdit component |
Please use the icon the SVG icon files and App.css file in the project source code at the end of the tutorial.
Step 5. Add the following code to the index.js file:
import React from 'react';
import ReactDOM from 'react-dom/client';
import App from './App';

const el = document.querySelector('#root');
const root = ReactDOM.createRoot(el);

root.render(<App />);Code language: JavaScript (javascript)
The index.js file renders the App component on the screen.
Step 6. Add the following code to the App.js file:
import TodoList from './components/TodoList';
import TodoCreate from './components/TodoCreate';
import './App.css';

const App = () => {
  return (
    <main className="main">
      <h1>
        React Todo <span>Streamline Your Day, the React Way!</span>
      </h1>
      <TodoList />
      <TodoCreate />
    </main>
  );
};

export default App;Code language: JavaScript (javascript)
The App component uses the TodoList and TodoCreate components.
Step 7. Add the following code to the TodoCreate component:
const TodoCreate = () => {
  return <div>Todo Create</div>;
};

export default TodoCreate;Code language: JavaScript (javascript)
Step 7. Add the following code to the TodoList component:
const TodoList = () => {
  return <div>Todo List</div>;
};

export default TodoList;Code language: JavaScript (javascript)
Step 8. Add the following code to the TodoEdit component:
const TodoEdit = () => {
  return <div>Todo Edit</div>;
};

export default TodoEdit;Code language: JavaScript (javascript)
Step 9. Add the following code to the TodoShow component:
const TodoShow = () => {
return <div>Todo Show </div>;
};
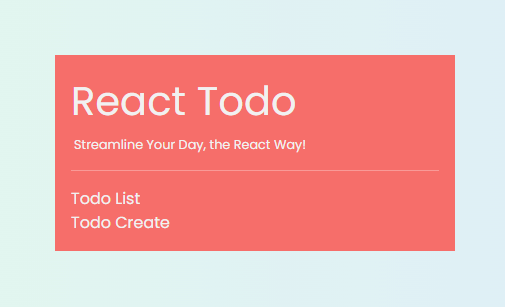
export default TodoShow;Code language: JavaScript (javascript)Step 10. Execute the following command in the terminal to run the app:
npm startCode language: JavaScript (javascript)The app will look like the following:
The App component
Step 1. Define a todos array as a state of the App component:
const [todos, setTodos] = useState([]);Code language: JavaScript (javascript)By default, the todos state is empty.
Step 2. Define a function that adds a new todo item to the todos list:
const createTodo = (title) => {
  const newTodo = { id: crypto.randomUUID(), title: title, completed: false };
  const updatedTodos = [...todos, newTodo];
  setTodos(updatedTodos);
};Code language: JavaScript (javascript)
In the createTodo() function:
First, create a new todo item object with three properties id, title, and completed.
The id takes a UUID value returned from the method crypto.randomUUID() provided by the web browser. The value of the completed property defaults to false.
Second, create a new array that includes the newly created todo item:
const updatedTodos = [...todos, newTodo];Code language: JavaScript (javascript)Notice that if you use the push() method to add a new todo item to the todos array, only the items of the todos array change but the todos array reference is the same. Therefore, React will not rerender the component because its state does not change.
Third, update the todos array with the new array using the setTodos() function:
setTodos(updatedTodos);Code language: JavaScript (javascript)This function call will cause the component to rerender.
Step 3. Define a removeTodo() function that removes a todo item by id from a todo list:
const removeTodo = (id) => {
  const updatedTodos = todos.filter((todo) => todo.id !== id);
  setTodos(updatedTodos);
};Code language: JavaScript (javascript)
In the removeTodo() function:
First, return a new array that does not contain the todo with the specified id using the filter() array method:
const updatedTodos = todos.filter((todo) => todo.id !== id);Code language: JavaScript (javascript)Second, update the todos state with the new array:
setTodos(updatedTodos);Code language: JavaScript (javascript)Step 4. Define the changeTodo function that changes the title and completed properties of a todo object specified by id:
const changeTodo = (id, title, completed = false) => {
  const updatedTodos = todos.map((todo) => {
    if (todo.id === id) {
      return { ...todo, title, completed };
    }
    return todo;
  });

  setTodos(updatedTodos);
};Code language: JavaScript (javascript)
Step 5. Pass the todos array, removeTodo function, and changeTodo function as props to the TodoList component and createTodo function as a prop of the TodoCreate component:
<TodoList todos={todos} removeTodo={removeTodo} changeTodo={changeTodo} />
<TodoCreate createTodo={createTodo} />Code language: JavaScript (javascript)
Here’s the complete App component:
import TodoList from './components/TodoList';
import TodoCreate from './components/TodoCreate';
import './App.css';
import { useState } from 'react';

const App = () => {
  const [todos, setTodos] = useState([]);

  const createTodo = (title) => {
    const newTodo = { id: crypto.randomUUID(), title, completed: false };
    const updatedTodos = [...todos, newTodo];
    setTodos(updatedTodos);
  };

  const removeTodo = (id) => {
    const updatedTodos = todos.filter((todo) => todo.id !== id);
    setTodos(updatedTodos);
  };

  const changeTodo = (id, title, completed = false) => {
    const updatedTodos = todos.map((todo) => {
      if (todo.id === id) {
        return { ...todo, title, completed };
      }
      return todo;
    });

    setTodos(updatedTodos);
  };

  return (
    <main className="main">
      <h1>
        React Todo <span>Streamline Your Day, the React Way!</span>
      </h1>
      <TodoList todos={todos} removeTodo={removeTodo} changeTodo={changeTodo} />
      <TodoCreate createTodo={createTodo} />
    </main>
  );
};

export default App;Code language: JavaScript (javascript)
The TodoCreate component
Modify the TodoCreate component.
Step 1. Add the createTodo function as the argument of the TodoCreate component:
const TodoCreate = ({ createTodo }) => {
    // ...
}Code language: JavaScript (javascript)
Step 2. Return a form that includes an input field for entering todo’s title:
return (
  <form className="todo-create">
    <input
      type="text"
      name="title"
      id="title"
      placeholder="Enter a todo"
    />
  </form>
);Code language: JavaScript (javascript)
Step 3. Define a state that holds the title of the input field and initialize its value to an empty string:
const [title, setTitle] = useState('');Code language: JavaScript (javascript)Step 4. Define a function handleChange that updates the title state to the current value of the input field:
const handleChange = (e) => {
  setTitle(e.target.value);
};Code language: JavaScript (javascript)
Step 5. Use the title state and handleChange event handler to the input field:
<input
  type="text"
  name="title"
  id="title"
  placeholder="Enter a todo"
  value={title}
  onChange={handleChange}
/>;Code language: JavaScript (javascript)
Step 6. Define a function handleSubmit that is executed once the form is submitted:
const handleSubmit = (e) => {
  e.preventDefault();
  createTodo(title);
  setTitle('');
};Code language: JavaScript (javascript)
In the handleSubmit() function:
First, call preventDefault() method of the event object to prevent the reloading of the page:
e.preventDefault();Code language: JavaScript (javascript)Second, call the createTodo function to create a new todo item and add it to the todos state in the App components.
Third, reset the input field to blank by setting the title state to an empty string:
setTitle('');Code language: JavaScript (javascript)Here’s the complete TodoCreate component:
import { useState } from 'react';

const TodoCreate = ({ createTodo }) => {
  const [title, setTitle] = useState('');

  const handleChange = (e) => {
    setTitle(e.target.value);
  };

  const handleSubmit = (e) => {
    e.preventDefault();
    createTodo(title);
    setTitle('');
  };

  return (
    <form onSubmit={handleSubmit} className="todo-create">
      <input
        type="text"
        name="title"
        id="title"
        placeholder="Enter a todo"
        value={title}
        onChange={handleChange}
      />
    </form>
  );
};

export default TodoCreate;Code language: JavaScript (javascript)
If you enter a todo and press enter, the new todo item is created and added to the todo list. However, you will not see it until we modify the TodoList component.
The TodoCreate component
Step 1. Add the todos, removeTodo function, and changeTodo function as the props of the TodoList component:
const TodoList = ({ todos, removeTodo, changeTodo }) => {
   // ...
}Code language: JavaScript (javascript)
Step 2. Generate a list of TodoShow components based on the todos array. Also, pass the todo object, removeTodo function, and changeTodo function to the TodoShow component:
const renderedTodos = todos.map((todo) => {
  return (
    <TodoShow
      key={todo.id}
      todo={todo}
      removeTodo={removeTodo}
      changeTodo={changeTodo}
    />
  );
});Code language: JavaScript (javascript)
Step 3. Render the todo list:
return <ul className="todo-list">{renderedTodos}</ul>;Code language: JavaScript (javascript)Here’s the complete TodoList component:
import TodoShow from './TodoShow';

const TodoList = ({ todos, removeTodo, changeTodo }) => {
  const renderedTodos = todos.map((todo) => {
    return (
      <TodoShow
        key={todo.id}
        todo={todo}
        removeTodo={removeTodo}
        changeTodo={changeTodo}
      />
    );
  });

  return <ul className="todo-list">{renderedTodos}</ul>;
};

export default TodoList;Code language: JavaScript (javascript)
The TodoShow component
Step 1. Add the todo object, removeTodo function, and changeTodo function as props for the TodoShow component:
const TodoShow = ({ todo, removeTodo, changeTodo }) => {
   // ..
}Code language: JavaScript (javascript)
Step 2. Define the ShowEdit state that displays the TodoEdit component when it is true:
const [showEdit, setShowEdit] = useState(false);Code language: JavaScript (javascript)By default, the TodoEdit component is hidden.
Step 3. Define an event handler handleDelete that will execute when the user clicks the Delete button:
const handleDelete = (e) => {
  removeTodo(todo.id);
};Code language: JavaScript (javascript)
Step 4. Define an event handler handleEdit that will execute when the user clicks the Edit button:
const handleEdit = (e) => {
  setShowEdit(true);
};Code language: JavaScript (javascript)
The handleEdit sets the showEdit state to true to show the TodoEdit component.
Step 5. Delete an event handler handleDoubleClick that will run when the user double-clicks the todo item:
const handleDoubleClick = (e) => {
  changeTodo(todo.id, todo.title, !todo.completed);
};Code language: JavaScript (javascript)
The handleDoubleClick calls the changeTodo function to toggle the value of the completed property.
Step 6. Define an event handler handleSubmit that will execute when the form on the TodoEdit component is submitted:
const handleSubmit = (id, title) => {
  changeTodo(id, title);
  setShowEdit(false);
};Code language: JavaScript (javascript)
How it works.
First, change the title of the todo based on the id by calling the changeTodo function:
changeTodo(id, title);Code language: JavaScript (javascript)Second, hide the TodoEdit component by setting the showEdit state to false:
setShowEdit(false);Code language: JavaScript (javascript)Step 7. Render the TodoEdit component if the showEdit is true:
if (showEdit) {
  return (
    <li className="todo">
      <TodoEdit todo={todo} onSubmit={handleSubmit} />
    </li>
  );
}Code language: JavaScript (javascript)
In this code, we pass the todo object and the handleSubmit function to the TodoEdit component.
Step 8. Render the todo item:
return (
  <li className="todo" onDoubleClick={handleDoubleClick}>
    <p className={todo.completed && 'completed'}>{todo.title}</p>

    <div className="actions">
      <button onClick={handleDelete}>
        <img src={DeleteIcon} title="Delete" />
      </button>
      <button onClick={handleEdit}>
        <img src={EditIcon} title="Edit" />
      </button>
    </div>
  </li>
);Code language: JavaScript (javascript)
How it works.
First, add the handleDoubleClick event handler to the onDoubleClick event of the li element.
<li className="todo" onDoubleClick={handleDoubleClick}>Code language: JavaScript (javascript)Second, add the completed CSS class to the <p> element if the completed property of the todo object is true:
<p className={todo.completed && 'completed'}>{todo.title}</p>Code language: JavaScript (javascript)Third, add the handleDelete and handleEdit event handlers to the onClick event of the corresponding button:
<div className="actions">
  <button onClick={handleDelete}>
    <img src={DeleteIcon} title="Delete" />
  </button>
  <button onClick={handleEdit}>
    <img src={EditIcon} title="Edit" />
  </button>
</div>;Code language: JavaScript (javascript)
The TodoEdit component
First, add the todo object and onSubmit function as the props of the TodoEdit component:
const TodoEdit = ({ todo, onSubmit }) => {
   // ...
};Code language: JavaScript (javascript)
Step 2. Define the title state of the TodoEdit component and initialize its value to the title of the todo object:
const [title, setTitle] = useState(todo.title);Code language: JavaScript (javascript)Step 3. Define an event handler that will run when the user changes the title via the edit form:
const handleChange = (e) => {
  setTitle(e.target.value);
};Code language: JavaScript (javascript)
The handleChange function calls the setTitle function to update the title state to the current value of the input element.
Step 4. Define an event handler that will run when the user submits the form:
const handleSubmit = (e) => {
  e.preventDefault();
  onSubmit(todo.id, title);
};Code language: JavaScript (javascript)
First, call the preventDefault() method of the event object to prevent the page from reloading:
e.preventDefault();Code language: JavaScript (javascript)Second, call the onSubmit function that updates the title for the todo and hides the TodoEdit component:
onSubmit(todo.id, title);Code language: JavaScript (javascript)Step 5. render the form and wire up the event handler:
return (
  <form className="todo-edit">
    <input type="text" value={title} onChange={handleChange} />
    <button type="submit" onClick={handleSubmit}>
      <img src={CheckIcon} title="Save" />
    </button>
  </form>
);Code language: JavaScript (javascript)
Here’s the complete TodoEdit component:
import { useState } from 'react';
import CheckIcon from '../check.svg';

const TodoEdit = ({ todo, onSubmit }) => {
  const [title, setTitle] = useState(todo.title);

  const handleChange = (e) => {
    setTitle(e.target.value);
  };

  const handleSubmit = (e) => {
    e.preventDefault();
    onSubmit(todo.id, title);
  };

  return (
    <form className="todo-edit">
      <input type="text" value={title} onChange={handleChange} />
      <button type="submit" onClick={handleSubmit}>
        <img src={CheckIcon} title="Save" />
      </button>
    </form>
  );
};

export default TodoEdit;Code language: JavaScript (javascript)
Download the React Todo App source code.