Summary: In this tutorial, you will learn how to create your first React Native app called Hello World.
Prerequisites
This tutorial assumes that you have set up the React Native development environment on your computer and have the Expo Go app installed on your phone.
Creating a new React Native project
We’ll create a new Expo and React Native project using the create-expo-app command. This create-expo-app tool allows you to quickly initialize a project with a template.
Step 1. Open your terminal and run the following command to create a new project called helloworld:
npx create-expo-app helloworld --template blankCode language: plaintext (plaintext)In this command:
- The
create-expo-appcommand creates thehelloworlddirectory for the project. - The
--template blankoption instructs the command to install all the necessary packages and initialize a blank React Native project.
Step 2. Navigate to the project directory:
cd helloworldCode language: plaintext (plaintext)Step 3. Run the app from your terminal using the following command:
npm startCode language: plaintext (plaintext)The npm start will execute the npx expo start command that runs the app. It’ll return the following output:
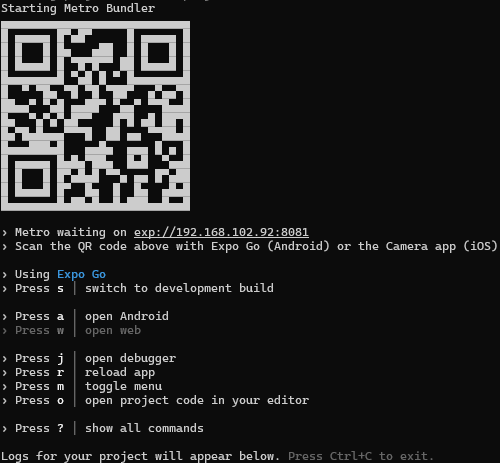
Notice that your QR code will likely be different.
Step 4. Scan the QR code to launch the app on your phone.
Once you scan the QR Code using the built-in Camera, Expo Go will open the app on your phone. You’ll see the following message appear on your phone:
Open up App.js to start working on your app!Code language: CSS (css)The Hello World App
Step 1. Open the project directory using your favorite code editor.
Step 2. Open the App.js file and change the code to the following:
import { View, Text, StyleSheet } from 'react-native';

export default function App() {
  return (
    <View style={styles.container}>
      <Text style={styles.text}>Hello, World!</Text>
    </View>
  );
}

const styles = StyleSheet.create({
  container: {
    flex: 1,
    justifyContent: 'center',
    alignItems: 'center',
  },
  text: {
    fontSize: 40,
  }
});
Code language: JavaScript (javascript)
Output:
How it works.
First, import StyleSheet, Text, and View from the react-native library:
import { View, Text, StyleSheet } from 'react-native';Code language: JavaScript (javascript)In this syntax, we import three objects from the react-native library:
Viewis a basic component in React Native for building a user interface (UI). Views work likedivelements in HTML, which serve as a container for wrapping other components. Under the hood, React Native translates theViewcomponent directly to the native view on Android (android.View) and iOS (UIView).Textis a core component for displaying text.StyleSheetcreates an object that works like the CSS Stylesheet.
Second, create an App component that returns a piece of JSX and exports it using a default export.
export default function App() {
  return (
    <View style={styles.container}>
      <Text style={styles.text}>Hello, World!</Text>
    </View>
  );
}Code language: JavaScript (javascript)
Like React, a component in React Native is a function that returns some JSX.
In this example, the App function returns a View that contains a Text with the text Hello, World! Both View and Text components have a prop called style that accepts values that come from the styles object.
Third, define the styles object using the create() function from the StyleSheet:
const styles = StyleSheet.create({
  container: {
    flex: 1,
    justifyContent: 'center',
    alignItems: 'center',
  },
  text: {
    fontSize: 40,
  }
});Code language: JavaScript (javascript)
In the create() function, we define an object with two properties container and text with values are JavaScript objects that work like CSS, defining the look and feel of components.
- The
containerproperty usesflex: 1,justifyContent: center, andalignItems: centerto place its child components in the center, which in this example, is the center of the screen. - The
textproperty specifies a font size of 40, which sets the font size to 40 for the Text component.
If you save the file and open your Expo Go, you’ll see the instant on your phone. The message changes to the following:
Hello, World!This feature is called hot reloading, which helps speed up development, allowing you to change the code and instantly see the UI change in the app.
Summary
- Run the
npx create-expo-app project-name --template blankto create a React Native project with the nameproject-name. - Execute the
npm startto start the app and scan the QR code to launch the app on your phone using the Expo Go app.